springboot(一)_快速上手springboot

本系列所有源码可以在github获取

微服务概念

优点

在传统的单体应用中,所有模块耦合在一起,当我们需要修改某个模块的业务时,需要对整个应用重新进行部署再发布,这样带来的时间成本,以及风险,都是相对较大的。而微服务的架构中,所有的业务模块经过拆分,自成一体,形成单独的应用,不管是对于开发维护,还是应用拓展,都有极大的好处。

缺点

各个服务形成单独的应用,这样减少了耦合,但是,在业务场景中,当我们服务之间需要聚合时,链路调用的成本会比单体应用高。

SpringBoot 入门

SpringBoot很大程度上简化了项目搭建,在传统的框架中,框架搭建者需要写大量xml文件,而这些文件在各个项目中,很多都是可以复用的,这种重复的工作不符合技术人员的自我要求。并且,对于框架使用者来说,xml文件相对不好阅读,不好维护。SpringBoot可以开箱即用,让技术人员的关注点,集中在业务逻辑上。

new 一个 SpringBoot工程

1.使用spring官方的脚手架生成项目zip包

2.使用idea构建项目(本质也是通过官方脚手架生成项目,此处一定要连网)

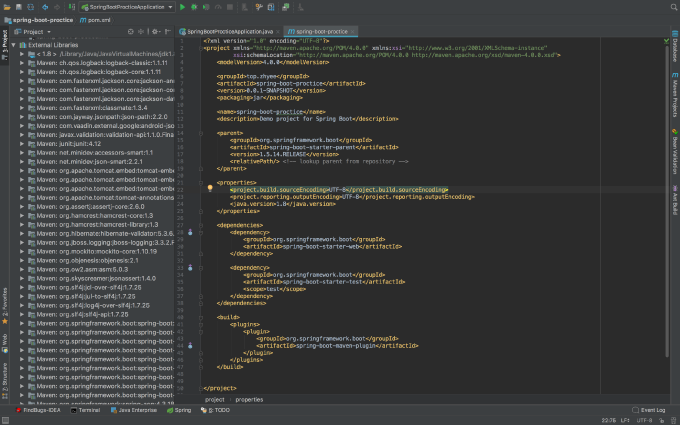
3.生成一个maven项目,pom添加起步依赖,并添加启动类

1
2
3
4
5
6
7
8
9
10
/**
* 这是一个启动类
*/
@SpringBootApplication
public class SpringBootProcticeApplication {

public static void main(String[] args) {
SpringApplication.run(SpringBootProcticeApplication.class, args);
}
}

SpringBoot的启动类是一个main函数,在类名上添加 @SpringBootApplication

PnkAnH.md.png

SpringBoot通过起步依赖,与依赖传递,对maven中依赖的 jar 包进行了统一的管控,减少了 jar 包版本冲突的麻烦,例如,我们需要做 web 开发,只用加入 spring-boot-starter-web 这个起步依赖,SpringBoot会自动引入版本合适的 web 需要的包

PnkC9K.png

第一个请求示例

在启动类所在的包,或其子包中,新建一个controller(SpringBoot的自动扫描范围为启动类所在的包及其子包,如果在此范围外的类,需要添加注解,否则无法扫描)

1
2
3
4
5
6
7
8
9
10
11
12
13
/**
* @author zhyee
* @date 2018/7/9 下午3:42
*/
@RestController
@RequestMapping("/hello")
public class HelloController {

@GetMapping
public String sayHello(@RequestParam(value = "name") String name) {
return name + " say hello";
}
}

如果使用默认的 8080 端口,直接启动项目就可以,如果要更改接口,可以在配置文件中配置 server.port

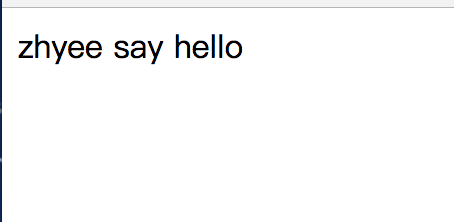
启动完成之后,浏览器访问 http://localhost:8080/hello?name=zhyee 可以看到如下页面
Pnkph6.png

过滤器

自定义的过滤器,只需要实现 servlet 的 Filter 接口

1
2
3
4
5
6
7
8
9
10
11
12
13
14
15
16
17
18
19
20
21
22
23
24
25
26
27
28
29
/**
* 过滤器
* @author zhyee
* @date 2018/7/9 下午4:12
*/
@Component
public class TimeFilter implements Filter {

@Override
public void init(FilterConfig filterConfig) throws ServletException {
System.out.println("time filter init...");
}

@Override
public void doFilter(ServletRequest request, ServletResponse response, FilterChain chain) throws IOException, ServletException {
System.out.println("time filter start...");
long start = new Date().getTime();
//调用过滤链中的下一个过滤器,在这个方法之前,可以添加对request的处理
chain.doFilter(request, response);
System.out.println("time filter 耗时:" + (new Date().getTime() - start));
System.out.println("time filter finish...");

}

@Override
public void destroy() {
System.out.println("time filter destroy...");
}
}

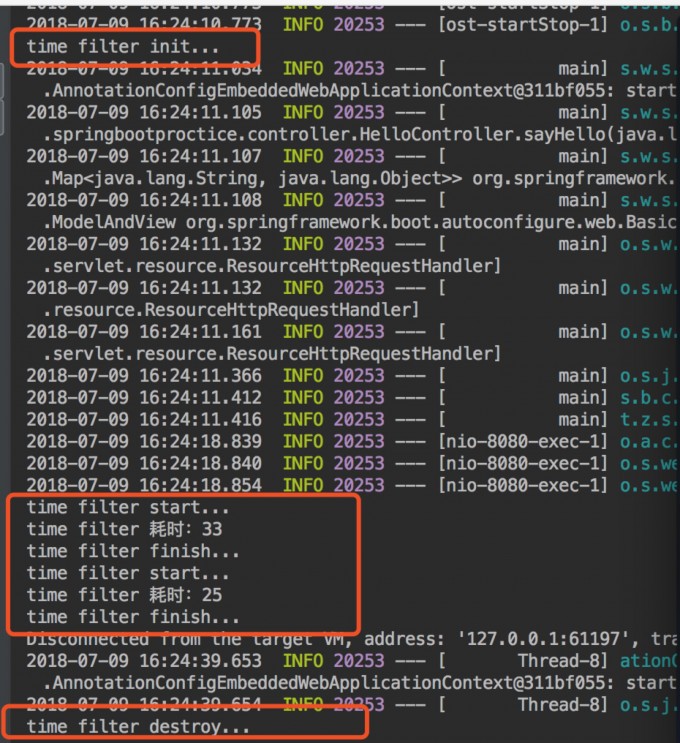
Init 方法会在项目启动时调用,doFilter 方法在执行方法时调用,由于这里使用了 @Component 注解,因此每个

方法的调用都会通过过滤器,destroy 方法在项目停止时调用。

启动项目并请求 controller 中的接口,可以看到控制台成功打印了时间。第一次打印是调用接口,第二次打印是请求网站图标。

PnkicD.md.jpg

添加自定义的过滤路径,需要添加配置,在 urls 中设置需要执行过滤器的路径。由于项目中没有/user路径,因此,添加该配置后,不会执行过滤器中的操作。

1
2
3
4
5
6
7
8
9
10
11
12
13
14
15
16
17
/**
* @author zhyee
* @date 2018/7/9 下午4:47
*/
@Configuration
public class WebConfig extends WebMvcConfigurerAdapter {
@Bean
public FilterRegistrationBean timeFilter(){
FilterRegistrationBean registrationBean = new FilterRegistrationBean();
TimeFilter timeFilter = new TimeFilter();
registrationBean.setFilter(timeFilter);
List<String> urls = new ArrayList<>();
urls.add("/user/*");//添加需要执行过滤的路径
registrationBean.setUrlPatterns(urls);
return registrationBean;
}
}

拦截器

拦截器与过滤器类似,实现自定义的拦截器需要三步

  • 创建自定义的拦截器,实现 HandlerInterceptor 接口
  • 添加配置类,继承 WebMvcConfigurerAdapter ,重写 addInterceptors 方法
  • 实例化自定义的拦截器,并添加到过滤器链中
1
2
3
4
5
6
7
8
9
10
11
12
13
14
15
16
17
18
19
20
21
22
23
24
25
26
27
28
29
30
/**
* @author zhyee
* @date 2018/7/9 下午5:08
*/
@Component
public class TimeInterceptor implements HandlerInterceptor {
@Override
public boolean preHandle(HttpServletRequest httpServletRequest, HttpServletResponse httpServletResponse, Object handler) throws Exception {
System.out.println("preHandler");
System.out.println(((HandlerMethod)handler).getBean().getClass().getName());
System.out.println(((HandlerMethod)handler).getMethod().getName());
httpServletRequest.setAttribute("startTime", new Date().getTime());
return true;
}

@Override
public void postHandle(HttpServletRequest httpServletRequest, HttpServletResponse httpServletResponse, Object o, ModelAndView modelAndView) throws Exception {
System.out.println("postHandler");
Long start = (Long) httpServletRequest.getAttribute("startTime");
System.out.println("time interceptor 耗时:" + (new Date().getTime() - start));
}

@Override
public void afterCompletion(HttpServletRequest httpServletRequest, HttpServletResponse httpServletResponse, Object o, Exception e) throws Exception {
System.out.println("afterCompletion");
Long start = (Long) httpServletRequest.getAttribute("startTime");
System.out.println("time interceptor 耗时:" + (new Date().getTime() - start));
System.out.println("ex is " + e);
}
}
1
2
3
4
5
6
7
8
9
10
11
12
13
14
/**
* @author zhyee
* @date 2018/7/9 下午4:47
*/
@Configuration
public class WebConfig extends WebMvcConfigurerAdapter {
@Autowired
private TimeInterceptor timeInterceptor;

@Override
public void addInterceptors(InterceptorRegistry registry) {
registry.addInterceptor(timeInterceptor).addPathPatterns("/hello");
}
}

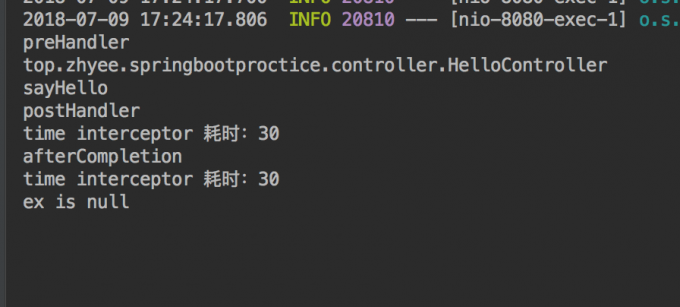
控制台会打印出如下内容

PnkFje.md.png

切面

使用AOP,首先需要引入 spring-boot-starter-aop 依赖,然后定义一个切面

1
2
3
4
<dependency>
<groupId>org.springframework.boot</groupId>
<artifactId>spring-boot-starter-aop</artifactId>
</dependency>
1
2
3
4
5
6
7
8
9
10
11
12
13
14
15
16
17
18
19
20
21
/**
* @author zhyee
* @date 2018/7/9 下午5:32
*/
@Aspect
@Component
public class TimeAspect {
@Around("execution(* top.zhyee.springbootproctice.controller.HelloController.*(..))")
public Object handlerControllerMethod(ProceedingJoinPoint pjp) throws Throwable{
System.out.println("time aspcet start");
Object[] args = pjp.getArgs();
for(Object arg : args){
System.out.println("arg is " + arg);
}
long start = new Date().getTime();
Object object = pjp.proceed();
System.out.println("time aspect 耗时:" + (new Date().getTime() - start));
System.out.println("time aspect end");
return object;
}
}

@Aspect:将java类定义为切面

@Around:在切入点前后切入内容,并控制何时执行切入点自身内容(也可以使用 @Before,@After 等注解)

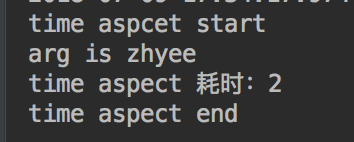
启动项目,请求接口,执行结果如下:
PnkP1O.png