本系列所有源码可以在github获取
微服务概念
优点
在传统的单体应用中,所有模块耦合在一起,当我们需要修改某个模块的业务时,需要对整个应用重新进行部署再发布,这样带来的时间成本,以及风险,都是相对较大的。而微服务的架构中,所有的业务模块经过拆分,自成一体,形成单独的应用,不管是对于开发维护,还是应用拓展,都有极大的好处。
缺点
各个服务形成单独的应用,这样减少了耦合,但是,在业务场景中,当我们服务之间需要聚合时,链路调用的成本会比单体应用高。
SpringBoot 入门
SpringBoot很大程度上简化了项目搭建,在传统的框架中,框架搭建者需要写大量xml文件,而这些文件在各个项目中,很多都是可以复用的,这种重复的工作不符合技术人员的自我要求。并且,对于框架使用者来说,xml文件相对不好阅读,不好维护。SpringBoot可以开箱即用,让技术人员的关注点,集中在业务逻辑上。
new 一个 SpringBoot工程
1.使用spring官方的脚手架生成项目zip包
2.使用idea构建项目(本质也是通过官方脚手架生成项目,此处一定要连网)
3.生成一个maven项目,pom添加起步依赖,并添加启动类
1 | /** |
SpringBoot的启动类是一个main函数,在类名上添加 @SpringBootApplication

SpringBoot通过起步依赖,与依赖传递,对maven中依赖的 jar 包进行了统一的管控,减少了 jar 包版本冲突的麻烦,例如,我们需要做 web 开发,只用加入 spring-boot-starter-web 这个起步依赖,SpringBoot会自动引入版本合适的 web 需要的包
第一个请求示例
在启动类所在的包,或其子包中,新建一个controller(SpringBoot的自动扫描范围为启动类所在的包及其子包,如果在此范围外的类,需要添加注解,否则无法扫描)
1 | /** |
如果使用默认的 8080 端口,直接启动项目就可以,如果要更改接口,可以在配置文件中配置 server.port
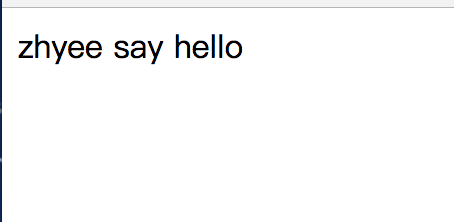
启动完成之后,浏览器访问 http://localhost:8080/hello?name=zhyee 可以看到如下页面
过滤器
自定义的过滤器,只需要实现 servlet 的 Filter 接口
1 | /** |
Init 方法会在项目启动时调用,doFilter 方法在执行方法时调用,由于这里使用了 @Component 注解,因此每个
方法的调用都会通过过滤器,destroy 方法在项目停止时调用。
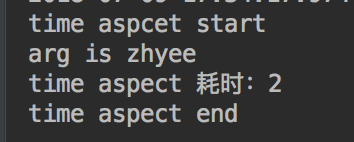
启动项目并请求 controller 中的接口,可以看到控制台成功打印了时间。第一次打印是调用接口,第二次打印是请求网站图标。
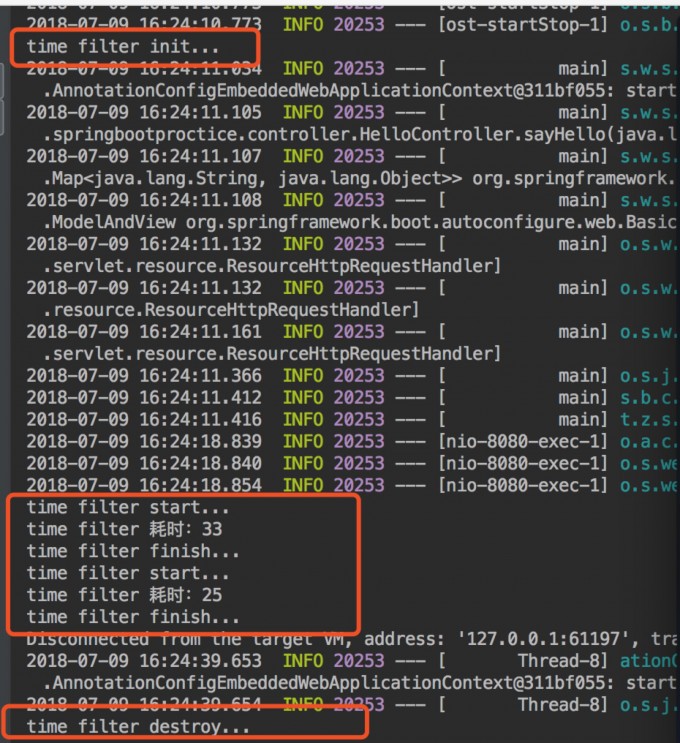
添加自定义的过滤路径,需要添加配置,在 urls 中设置需要执行过滤器的路径。由于项目中没有/user路径,因此,添加该配置后,不会执行过滤器中的操作。
1 | /** |
拦截器
拦截器与过滤器类似,实现自定义的拦截器需要三步
- 创建自定义的拦截器,实现 HandlerInterceptor 接口
- 添加配置类,继承 WebMvcConfigurerAdapter ,重写 addInterceptors 方法
- 实例化自定义的拦截器,并添加到过滤器链中
1 | /** |
1 | /** |
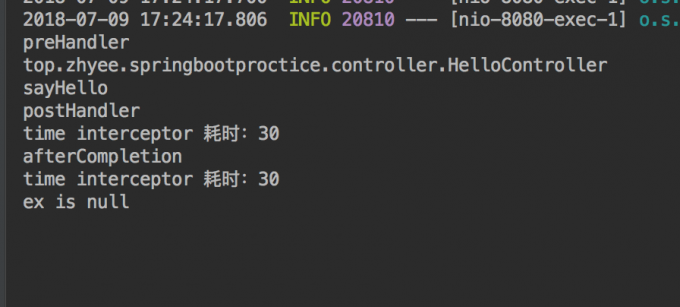
控制台会打印出如下内容
切面
使用AOP,首先需要引入 spring-boot-starter-aop 依赖,然后定义一个切面
1 | <dependency> |
1 | /** |
@Aspect:将java类定义为切面
@Around:在切入点前后切入内容,并控制何时执行切入点自身内容(也可以使用 @Before,@After 等注解)
启动项目,请求接口,执行结果如下: