本系列所有源码可以在github获取
使用Eureka进行服务注册与发现
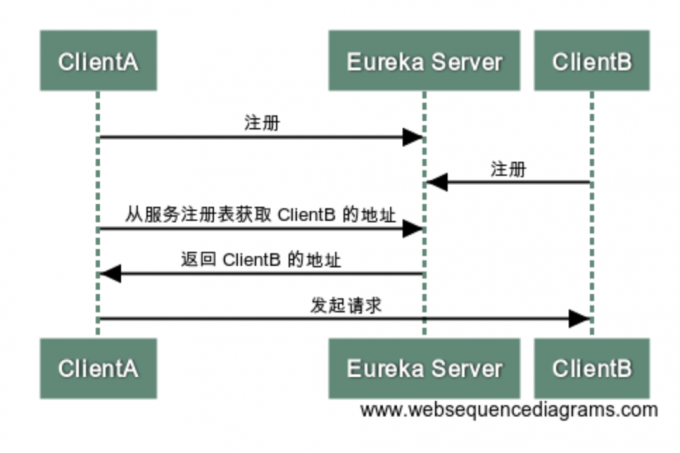
Eureka 是 Netflix 出品的实现服务注册和发现的工具,在实际的开发过程中,由于微服务众多,服务之间的调用频繁,因此,需要统一的服务注册中心进行管理,将需要的服务注册到服务中心,方便调用以及管控。Eureka 分为Eureka Client 与 Eureka Server 。服务端为注册中心,客户端是我们的各个微服务。调用过程大致如下
配置 Eureka Server
添加 spring-cloud-starter-eureka-server 依赖
在 SpringBoot 启动类上添加 @EnableEurekaServer 注解开启 Eureka Server 功能
配置文件添加 eureka.client.service-url.defaultZone ,eureka.client.register-with-eureka,eureka.client.fetch-registry参数
pom文件添加
1
2
3
4<dependency>
<groupId>org.springframework.cloud</groupId>
<artifactId>spring-cloud-starter-eureka-server</artifactId>
</dependency>启动类
1
2
3
4
5
6
7
public class EurekaServerApplication {
public static void main(String[] args) {
SpringApplication.run(EurekaServerApplication.class, args);
}
}配置文件 application.properties
1
2
3
4
5
spring.application.name=eureka-server
eureka.client.service-url.defaultZone=http://localhost:8761/eureka
eureka.client.register-with-eureka=false
eureka.client.fetch-registry=false
server.port=8761
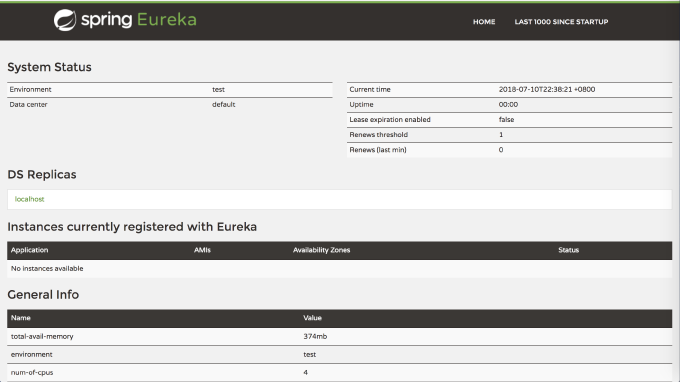
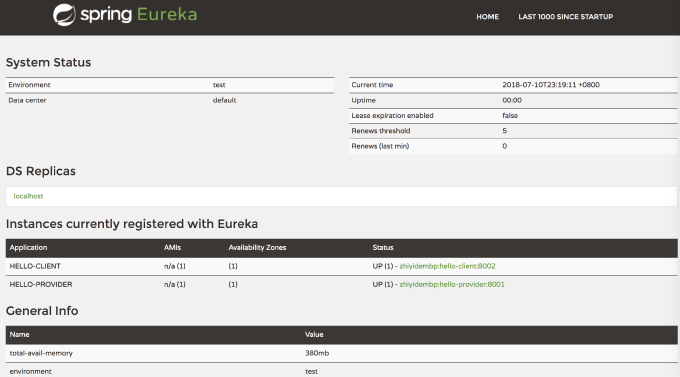
一个 Eureka Server 就配置完成了,启动项目,访问 http://localhost:8761 可以看到 Eureka 的页面
配置 Eureka Client
为了配合后面的 Feign ,这里新建一个 hello-client 服务用作 Feign 客户端
添加 spring-cloud-starter-eureka 依赖
在 SpringBoot 启动类上添加 @EnableDiscoveryClient 注解
配置文件添加 eureka.client.service-url.defaultZone 参数
pom文件添加
1
2
3
4
5
6
7
8<dependency>
<groupId>org.springframework.boot</groupId>
<artifactId>spring-boot-starter-web</artifactId>
</dependency>
<dependency>
<groupId>org.springframework.cloud</groupId>
<artifactId>spring-cloud-starter-eureka</artifactId>
</dependency>启动类,这里也可以使用 @EnableEurekaClient 注解,@EnableDiscoveryClient基于spring-cloud-commons,可以有多种实现,如eureka, consul, zookeeper。 @EnableEurekaClient基于spring-cloud-netflix,仅支持 Eureka ,应用场景比较单一
1
2
3
4
5
6
7
public class HelloClientApplication {
public static void main(String[] args) {
SpringApplication.run(HelloClientApplication.class, args);
}
}配置文件 application.properties
1
2
3
server.port=8002
eureka.client.service-url.defaultZone=http://localhost:8761/eureka
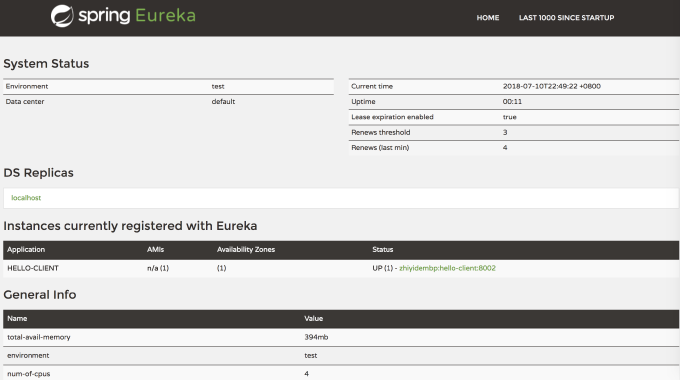
spring.application.name=hello-client启动项目,在控制台可以看到已经注册了

然后刷新 Eureka Server 的页面,能够看到注册的实例
使用 Feign 进行服务间的调用
在分布式的架构中,由于服务间的分散,在复杂的业务逻辑中,略显麻烦,Feign的主要目标就是将这种调用变得简单,使用接口的形式消费服务。目前,在Spring cloud 中服务之间通过restful调用有两种方式 :
- restTemplate+Ribbon
- feign
feign的使用更为优雅。
服务提供者
新建一个 hello-provider 提供服务,这个项目中不需要使用 feign 的配置,仅实现一个 Eureka Client以便调用,这里不做赘述,application.properties 配置如下
1 | server.port=8001 |
添加完 Eureka Client 的配置后,新建一个controller,提供调用资源
1 | /** |
服务消费者
接下来把前面的 hello-client 改造成服务消费者
- 添加 spring-cloud-starter-openfeign 依赖
- 启动类添加 @EnableFeignClients 注解并配置扫描包
- 添加 FeignClient 接口
pom文件添加
1 | <dependency> |
修改后的启动类
1 |
|
新增 controller
1 | /** |
FeignClient 接口
1 | /** |
修改完成,依次启动 eureka-server和两个 eureka client,成功注册
访问http://localhost:8002/hello/say ,hello-provider所提供的返回值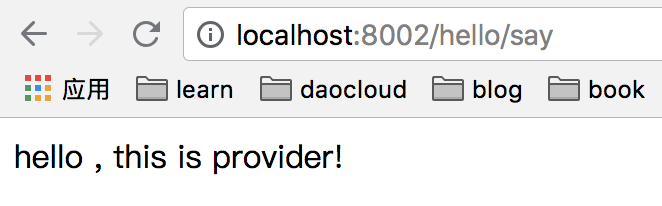
使用 Zipkin 实现分布式链路追踪
在复杂的微服务应用场景中,前端的一个请求往往涉及到多个服务,因此,需要一些能够分析系统行为的工具,以便在出现问题时,迅速地在调用链中定位到问题。Zipkin是由 Twitter 公司开源的一个用于收集微服务数据的系统。类似的组件也有 Pinpoint,Skywalking,CAT,EgleEye等,这里仅介绍 Zipkin 的使用。
实现 Zipkin Server
类比 Eureka ,我们首先需要实现一个 Zipkin Server
- 添加 zipkin-server,zipkin-autoconfigure-ui 依赖
- 启动类添加 @EnableZipkinServer 注解
新建一个名为 zipkin-server 的项目,pom文件添加
1 | <dependency> |
启动类
1 |
|
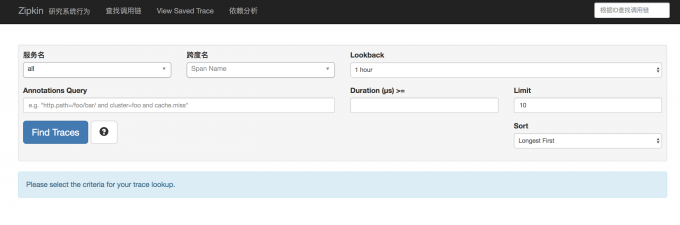
配置文件中仅配置了端口号 server.port=9090,启动项目,访问http://localhost:9090/zipkin/
构建链路调用
对前面的 hello-client 与 hello-provider 进行改造,分别在它们的 pom 中添加
1 | <dependency> |
以及在配置文件中添加 Zipkin 相关配置
1 | #默认值为0.1,无法展示 |
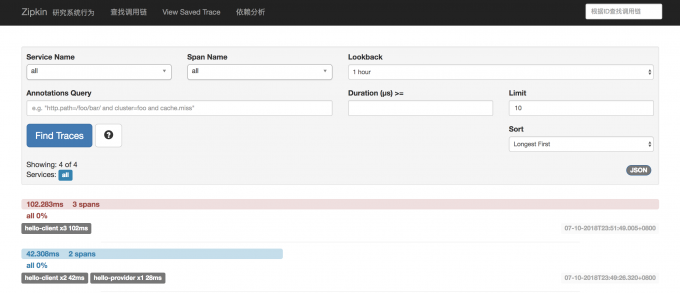
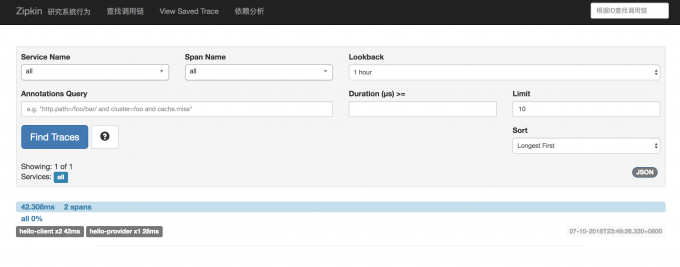
然后分别启动以上四个项目,启动后,访问http://localhost:8002/hello/say ,成功得到返回信息。刷新 zipkin 页面,可以看到调用记录
如果停止 hello-provider ,再次访问http://localhost:8002/hello/say ,会得到如下界面